

A 60-year-old male with a history of cirrhosis arrives in your ED in extremis; no vital signs, massive hematemesis en route, and a presumptive diagnosis of ruptured esophageal varices. Your team initiates the massive transfusion protocol, secures the airway, and administers vasoactive agents. The bleeding remains brisk. Endoscopy isn’t immediately available, and your only option for tamponade is a Blakemore tube.
You’re confident in the steps, sort of. You’ve seen the EM:RAP video. But suddenly, you’re fumbling with ports, clamps, and pre-inflated balloons. Here’s what we learned, the hard way.
Indications for Blakemore Tube Placement
While rare in most EDs, a Blakemore tube is a life-saving temporizing measure when definitive therapy is delayed or unavailable. Key indications include:
-
Massive esophageal variceal bleeding unresponsive to initial management (octreotide, antibiotics, endoscopy).
-
Bridge to definitive therapy, such as endoscopic banding, TIPS, or surgical intervention.
-
Pre-transfer stabilization when awaiting critical care transport.
This is truly a last-resort intervention, due to risks like aspiration, esophageal rupture, and mucosal necrosis.
The Procedure: 5 Practical Pearls
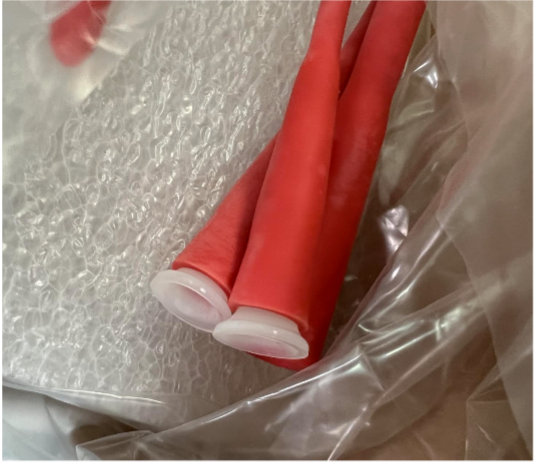
1. The Balloons Come Pre-Inflated
This is not intuitive.
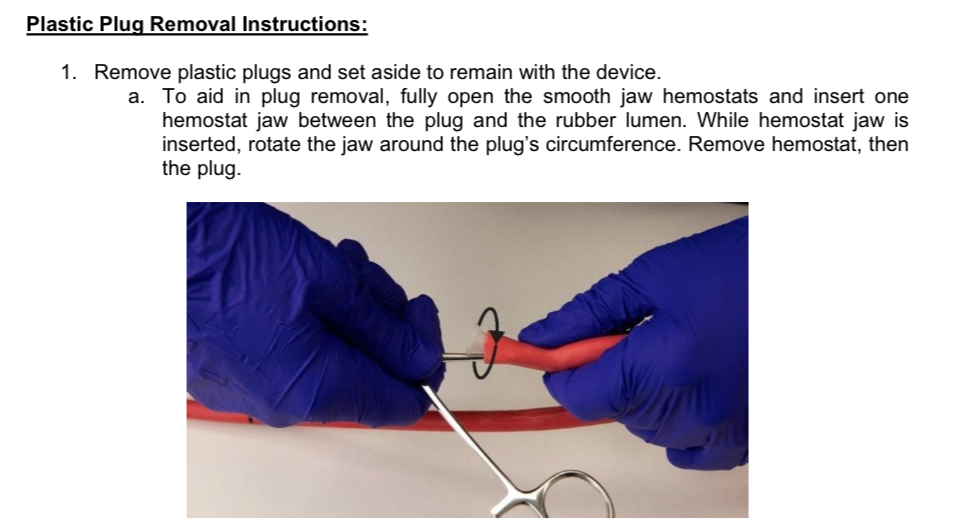
Each balloon (gastric and esophageal) arrives with a white plastic stopper capping the inflation port. These stoppers must be forcefully removed to deflate the balloons before use. Don’t be fooled—it feels like you’re breaking the device, but this is the correct step.
🛠️ Pro Tip: Use strong forceps or a towel grip to yank out the stopper. You’ll hear a satisfying hiss as the balloon deflates.
Important Note – RECALL NOTICE
All Bard® Blakemore tubes come with pre-inflated balloons sealed by white plastic stoppers. These plugs must be removed before use to allow deflation and subsequent re-inflation. However, an April 2025 product correction from BD (Becton Dickinson) highlights that removal of these plugs has been linked to serious adverse events, including device damage, delays in balloon inflation, and one reported patient death.¹
Removing the plugs requires significant force, and improper handling may damage the device or result in life-threatening delay. BD recommends all users review the recall notice (linked below) and have a replacement device readily available.
🔗 Read the official BD Medical Device Correction Notice (April 2025)
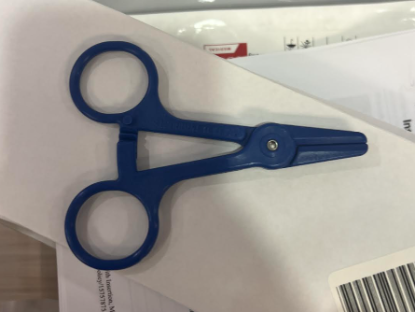
2. Clamp the Ports After Inflation
Once you have removed the plastic stoppers as described above and inflated your balloon to the desired volume, you need to clamp each port with these blue scissor clamps to keep the air inside the balloons after confirming placement. There is no valve to prevent air from escaping if you don’t clamp them.
💡 Think of this step as applying a tourniquet to your balloon inflation: inflate, confirm position, then clamp.
3. Insertion Requires Muscle & Magills
The tube itself is flimsy and unwieldy. Using a direct laryngoscope to visualize the oropharynx and Magill forceps to guide the tip into the esophagus can significantly improve your success rate. Liberally apply lubricant.
🧰 Pro Setup: One person to laryngoscope, one to guide the tube with forceps, and one to steady and advance.
4. Set Up Suction Early
Bleeding will persist until tamponade is confirmed. Have multiple suction catheters at the bedside, and connect the main gastric port to wall suction immediately once the tube is inserted.
⚠️ This reduces the risk of aspiration and clears your view for confirmation steps.
5. Call for X-Ray Before the Procedure
You’ll need a portable chest x-ray to confirm gastric balloon position before inflation and again after inflation. Don’t wait until you’ve inserted the tube—call radiology early to minimize delays.
📸 Aim to confirm the tube has passed into the stomach before inflating the gastric balloon (usually around 50 cm depth in adults).
Final Thoughts
The Blakemore tube can be life-saving—but only if you’re ready for its quirks. These tips aren’t often covered in standard teaching videos and can make or break your success in a high-stakes, high-stress environment. The best time to learn this is not at 3 a.m. during a code.