
Most emergency physicians are comfortable with the standard abdominal aortic aneurysm scan. However, that approach only visualizes the abdominal aorta. By adding three complementary views you can better assess aortic aneurysms and aortic dissections. In this blogpost you will learn how to visualize the aorta from the hepatic window, parasternal long-axis (PSLA), and suprasternal notch (SSN) view.

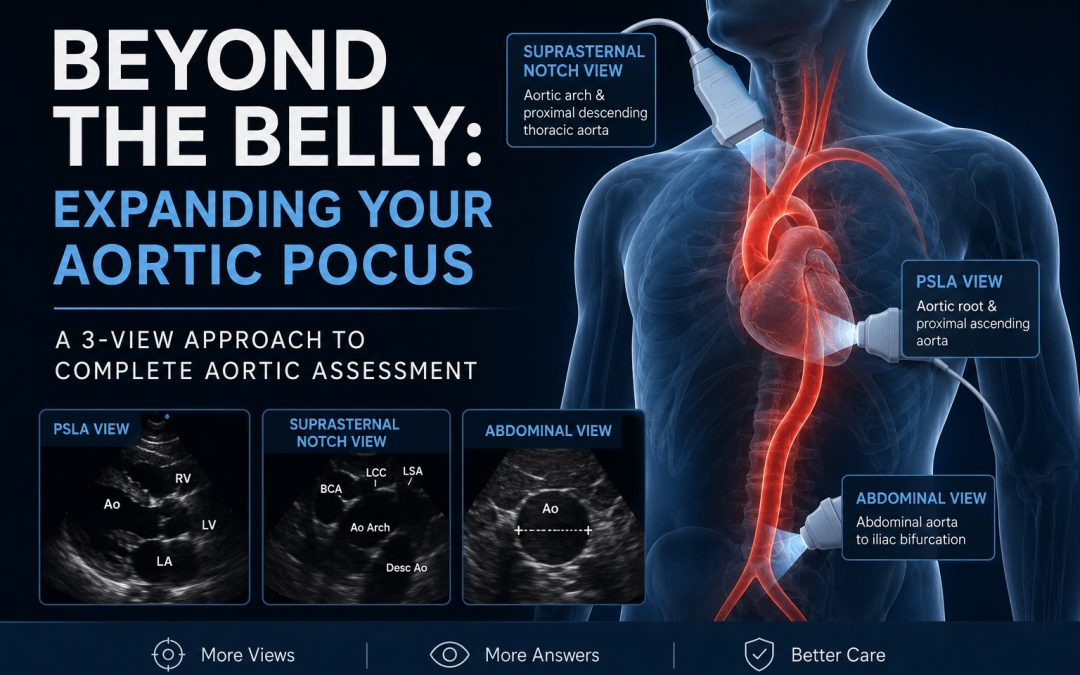
Figure 1: Aorta segments viewable with TTE using a combination of abdominal, PSLA, and SSN view.
The Three-View Aortic Approach
- Abdominal aortic view: abdominal aorta from the diaphragmatic hiatus to the iliac bifurcation
- +/- Hepatic window view: used to visualize the proximal-mid abdominal aorta in scenarios where the standard abdominal view is not possible (eg. patient positioning, excessive bowel gas, etc.)
- PSLA view: aortic root and proximal ascending aorta
- SSN view: distal ascending aorta, aortic arch, and proximal descending thoracic aorta
Quick Reminder: the Traditional Abdominal Aortic Scan
- Place a curvilinear probe just below the xiphoid with the marker toward the patient’s right. Save a clip of the aorta at this most proximal view.
- Continue to slide your probe caudally, visualizing the aorta the entire time.
- Save a second clip of the aorta at the midway point between your most proximal view and the umbilicus.
- Continue to follow the aorta distally to the iliac bifurcation. Save a final clip showing the transition of the distal abdominal aorta into the iliac bifurcation.
- Measure the aorta outer wall to outer wall at its widest point; an AAA is >3 cm.

Fig 2. Normal aorta visualized from transabdominal view.
High-Yield Troubleshooting Pearls
- Keep the probe perpendicular to the aorta to avoid oblique cuts and falsely enlarged measurements (see Fig 3, below).
- Use firm, sustained pressure to displace bowel gas.
- Have the patient flex their hip/knees to relax the abdominal wall
- Sweep slowly through the vessel rather than relying on a single frozen image.
- Decrease depth as the aorta becomes more superficial near the umbilicus.
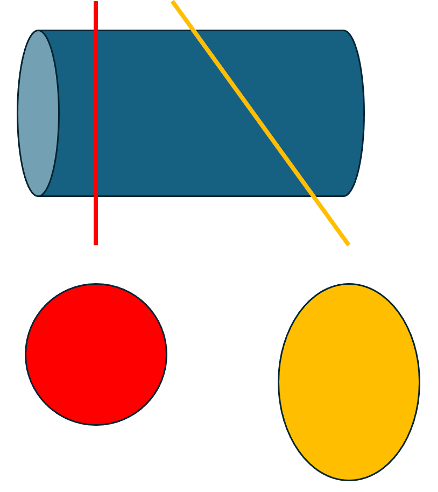
Fig 3. Illustration of accurate aorta cross-section with probe perpendicular to aorta (red line and circle) compared with falsely elongated cross-sectional view when probe is oblique to aorta (yellow line and oval).
Still can’t see the Aorta? Use the Hepatic Window
If you’re still having trouble visualizing the aorta despite the above trouble shooting tips, move to a right-sided hepatic window. This uses the same window most readers already know from the RUQ FAST examination.
- Place the curvilinear probe in the right mid-axillary line with the marker toward the patient’s head.
- Use a depth of approximately 15–20 cm.
- Angle slightly posteriorly through the liver toward the spine.
- You will usually see the IVC first. Continue deeper until you identify the thicker-walled, pulsatile aorta behind it.
This window is particularly useful for large proximal aneurysms hidden behind bowel gas. An abnormal study often shows a markedly enlarged aorta deep to the IVC.
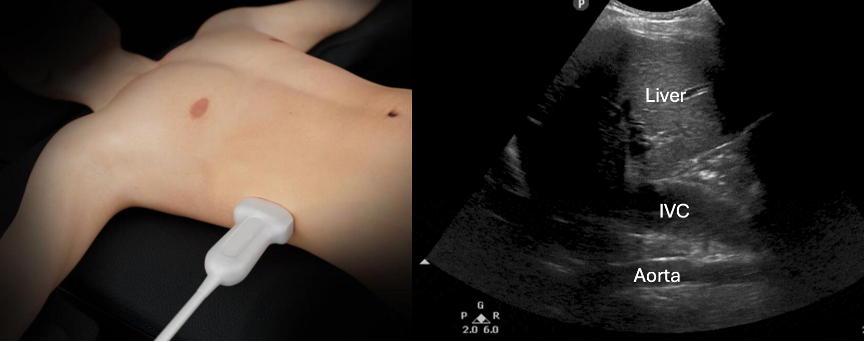
Fig 4. Normal hepatic window view with aorta seen far-field of the liver and IVC
PSLA: Seeing the Aortic Root
The PSLA view is the easiest bedside method to evaluate the aortic root, proximal ascending aorta, and a sliver of the descending thoracic aorta (refer to Fig 1 as a reminder). A markedly enlarged root or proximal ascending aorta should raise concern for thoracic aneurysm which is a risk for proximal aortic dissection. A Type-A dissection flap may also be directly visualized on a PSLA view.
- Use a phased-array probe with the cardiac preset.
- Obtain your usual PSLA view.
- Increase depth to you see a short-axis section of the descending thoracic aorta distal to the LV free wall
- Fan slightly superiorly and medially until the aortic root is centered.
- The aortic root should be measured in end-diastole from leading edge to leading edge.

Fig 5. Optimal PSLA view of normal heart. LV, left ventricle; LA, left atrium; LVoT, left ventricular outflow tract; RV, right ventricle; Ao, aorta (descending thoracic)
Normal aortic root diameter is generally <4 cm, but this measurement is variable by age and sex (see fig 6 & Table 1/2).

Fig 6. Sites for measurements of the aortic root and ascending aorta in PSLA view. This diagram illustrates the four sites at which measurements are recommended: 1 = aortic valve annulus (hinge point of aortic leaflets), 2 = aortic root at sinuses of Valsalva (maximal diameter, usually midpoint), 3 = STJ, 4 = proximal tubular portion of the ascending aorta. Ao, Aorta; LA, left atrium; LV, left ventricle. Figure adapted from Goldstein et al., 2015.

Table 1 & 2. Normal aortic root diameters by age for men (table 1) and women (table 2). Figure adapted from Goldstein et al., 2015.
The Suprasternal Notch View
The suprasternal notch view complements the PSLA view by visualizing the distal ascending aorta, aortic arch, and proximal descending thoracic aorta.
- Use a phased-array probe on the cardiac preset.
- Have your patient lay supine or sit upright with their head angled backwards and neck extended (Fig 7)
- Place the probe in the suprasternal notch with the marker toward the patient’s left shoulder (approximately 1 o’clock).
- Aim the beam inferiorly into the chest, almost parallel to the neck.
- A pillow beneath the shoulders may improve exposure in the supine patient.
- In a normal view, the aorta appears as a curved tube with the brachiocephalic, left common carotid, and left subclavian arteries arising superiorly (Fig 8)

Fig 7. Patient positioning and probe placement for the suprasternal notch view. Image from Fernando et al., 2017.
SSN View Pearls
- Aim deeper into the chest than you initially think; many poor images occur because the probe is pointed too superficially.
- Rock the probe slightly left and right to bring the arch into view.
- If the image is poorly defined, reduce depth and increase gain in the near field.
- Thoracic arch aneurysms are often easier to appreciate than a normal arch because the enlarged vessel lies closer to the notch.
- A visible intimal flap or aneurysmal dilation in this view should raise concern for a proximal Type A dissection (Fig 9).
Caution! Not seeing a dissection flap on the suprasternal notch view does not rule out a dissection – further imaging will likely still be required.

Fig 8. Suprasternal notch view of normal aorta.
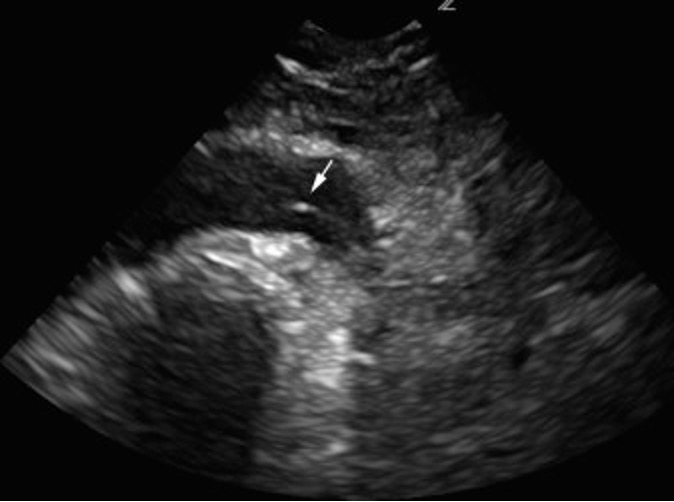
Fig 9. Suprasternal notch view of dissection flap seen in the aortic arch. Image from Fernando et al., 2017.
Bottom Line
Most clinicians already know the abdominal aortic scan. The next step is learning what to do when that view is limited and how to extend the examination above the diaphragm. Adding the hepatic window, PSLA, and SSN views allow you to evaluate far more of the aorta than the traditional AAA scan alone.
References
- American College of Emergency Physicians. (n.d.). Aorta. ACEP Sonoguide. https://www.acep.org/sonoguide/basic/aorta
- Fernando, S., Kisilewicz, M., & Millington, S. (2017). View from the top: Point-of-care ultrasound diagnosis of type A aortic dissection using the suprasternal view. The Journal of Emergency Medicine, 54(1), e13–e14.
- Goldstein, S. A., Evangelista, A., Abbara, S., Arai, A., Asch, F. M., Badano, L. P., Bolen, M. A., Connolly, H. M., Cuéllar-Calàbria, H., Czerny, M., Devereux, R. B., Flachskampf, F. A., Foster, E., Kramer, C. M., Kronzon, I., Lancellotti, P., Picard, M. H., Rodriguez, E. R., Schafers, H.-J., … Weissman, N. J. (2015). Multimodality imaging of diseases of the thoracic aorta in adults: From the American Society of Echocardiography and the European Association of Cardiovascular Imaging. Journal of the American Society of Echocardiography, 28(2), 119–182. https://doi.org/10.1016/j.echo.2014.11.015
- Mitchell, C., Rahko, P. S., Blauwet, L. A., Canaday, B., Finstuen, J. A., Foster, M. C., Horton, K., Ogunyankin, K. O., Palma, R. A., & Velazquez, E. J. (2019). Guidelines for performing a comprehensive transthoracic echocardiographic examination in adults: Recommendations from the American Society of Echocardiography. Journal of the American Society of Echocardiography, 32(1), 1–64. https://doi.org/10.1016/j.echo.2018.06.004
- POCUS 101. (n.d.). Aorta ultrasound made easy: Step-by-step guide. https://www.pocus101.com/aorta-ultrasound-made-easy-step-by-step-guide/


It seems that Ao and LV are accidentally swapped in the infografic at the beginning of the article 😉